User Guide
Welcome
CLIpboard is a user-friendly desktop application that helps educators manage their students' particulars.

CLIpboard was created with love by real teachers who faced the everyday challenge of managing large amounts of class information. We hope that CLIpboard will be able to serve you as reliably as it has for us.
ClIpboard will be great for you too if:
- You have to manage lots of students and classes
- You prefer typing
- You dislike dealing with boring spreadsheets
In this guide, we will walk you through the entire CLIpboard experience, whether you’re a beginner learning to set up, or you’re an advanced user looking to take your skills to the next level, you’re in the right place.
Let’s dive in!
Definitions
In this guide, you may come across some terms and conventions that you may be unfamiliar with. This section serves as a quick reference for these concepts.
- Command: A line of text that CLIpboard recognises as an instruction to execute.
-
Path: A line of text that describes a file location on a computer.
- Example:
C:/Users/AlexYeoh/Desktop/A0123456X.pngis a file path.
- Example:
- Navigate: Switching between the multiple pages that CLIpboard offers. (See the Navigation Guide for more information)
- Text formatted like
thisrepresents a program-related element. Depending on context, it can mean:- A command that CLIpboard recognises
- Example:
add group t15-4is a valid command you can execute.
- Example:
- A file path
- A keyboard key
- An element in the visual interface (See the Visuals section for more details)
- A command that CLIpboard recognises
-
”>” (Forward Angle Bracket): Indicates a sequence of actions for you to take.
- Example: “Click on
File > Exit” means you should click onFile, thenExit.
- Example: “Click on
- Note: Important information to be aware of.
- Tip: Useful information to help you enhance your skills with CLIpboard.
- Caution: Critical information about how CLIpboard behaves. Disregarding these might cause CLIpboard to not behave as you would expect.
Getting started
Setting up
Installation
- Ensure you have Java 11 or above installed on your Computer.
- Download the latest
clipboard.jarfrom here. - Copy
clipboard.jarto the folder you want to use as the home folder of CLIpboard.
Launching CLIpboard
Option 1:
- Double-click on
clipboard.jarto run it. If this does not work, go to Option 2.
Option 2:
- Open a command terminal. Guide to open a command terminal (External link).
- Copy the file path of the folder you put
clipboard.jarin.- Guides for getting a file path (External links):
- In the command terminal, type
cd <FILE_PATH>, where<FILE_PATH>is the file path you found in step 2. - Type
java -jar clipboard.jarinto the command terminal and pressENTERto launch CLIpboard.
If you see something like this, you’re good to go!
CLIpboard contains some sample data if there is no initial data, as is the case when you first launch it.
Quick Start
- When you first launch CLIpboard, you will be brought to the
Course page. - Type your command in the
Command Boxand pressENTER/RETURNto execute it.
e.g. typinghelpand pressing theENTER/RETURNkey will open the help window.
Some example commands you can try:-
select 1: Selects the first course displayed (eg.CS2103T) on theCourse Page. You will be redirected to theGroup Page. -
select 1: Selects the first group displayed (eg.T15) on theGroup Page. You will be redirected to theStudent Page. -
add student n/John Doe p/98765432 e/johnd@example.com sid/A1234567X: Adds a student namedJohn Doewith the particulars into the list on theStudent Page. -
delete student 3: Deletes the third student (eg. “Lim Kim Choo”) shown in the student list. -
undo: Returns to the state before the previousdelete studentcommand you entered. The deleted student (eg. “Lim Kim Choo”) should be back on the list. -
exit: Exits the app.
-
- Refer to the Features section below for a detailed description for each command.
Visuals
Before diving in, it might be useful to take a moment to understand some of CLIpboard’s visual elements. It will make it an even more of a breeze to use CLIpboard effectively!
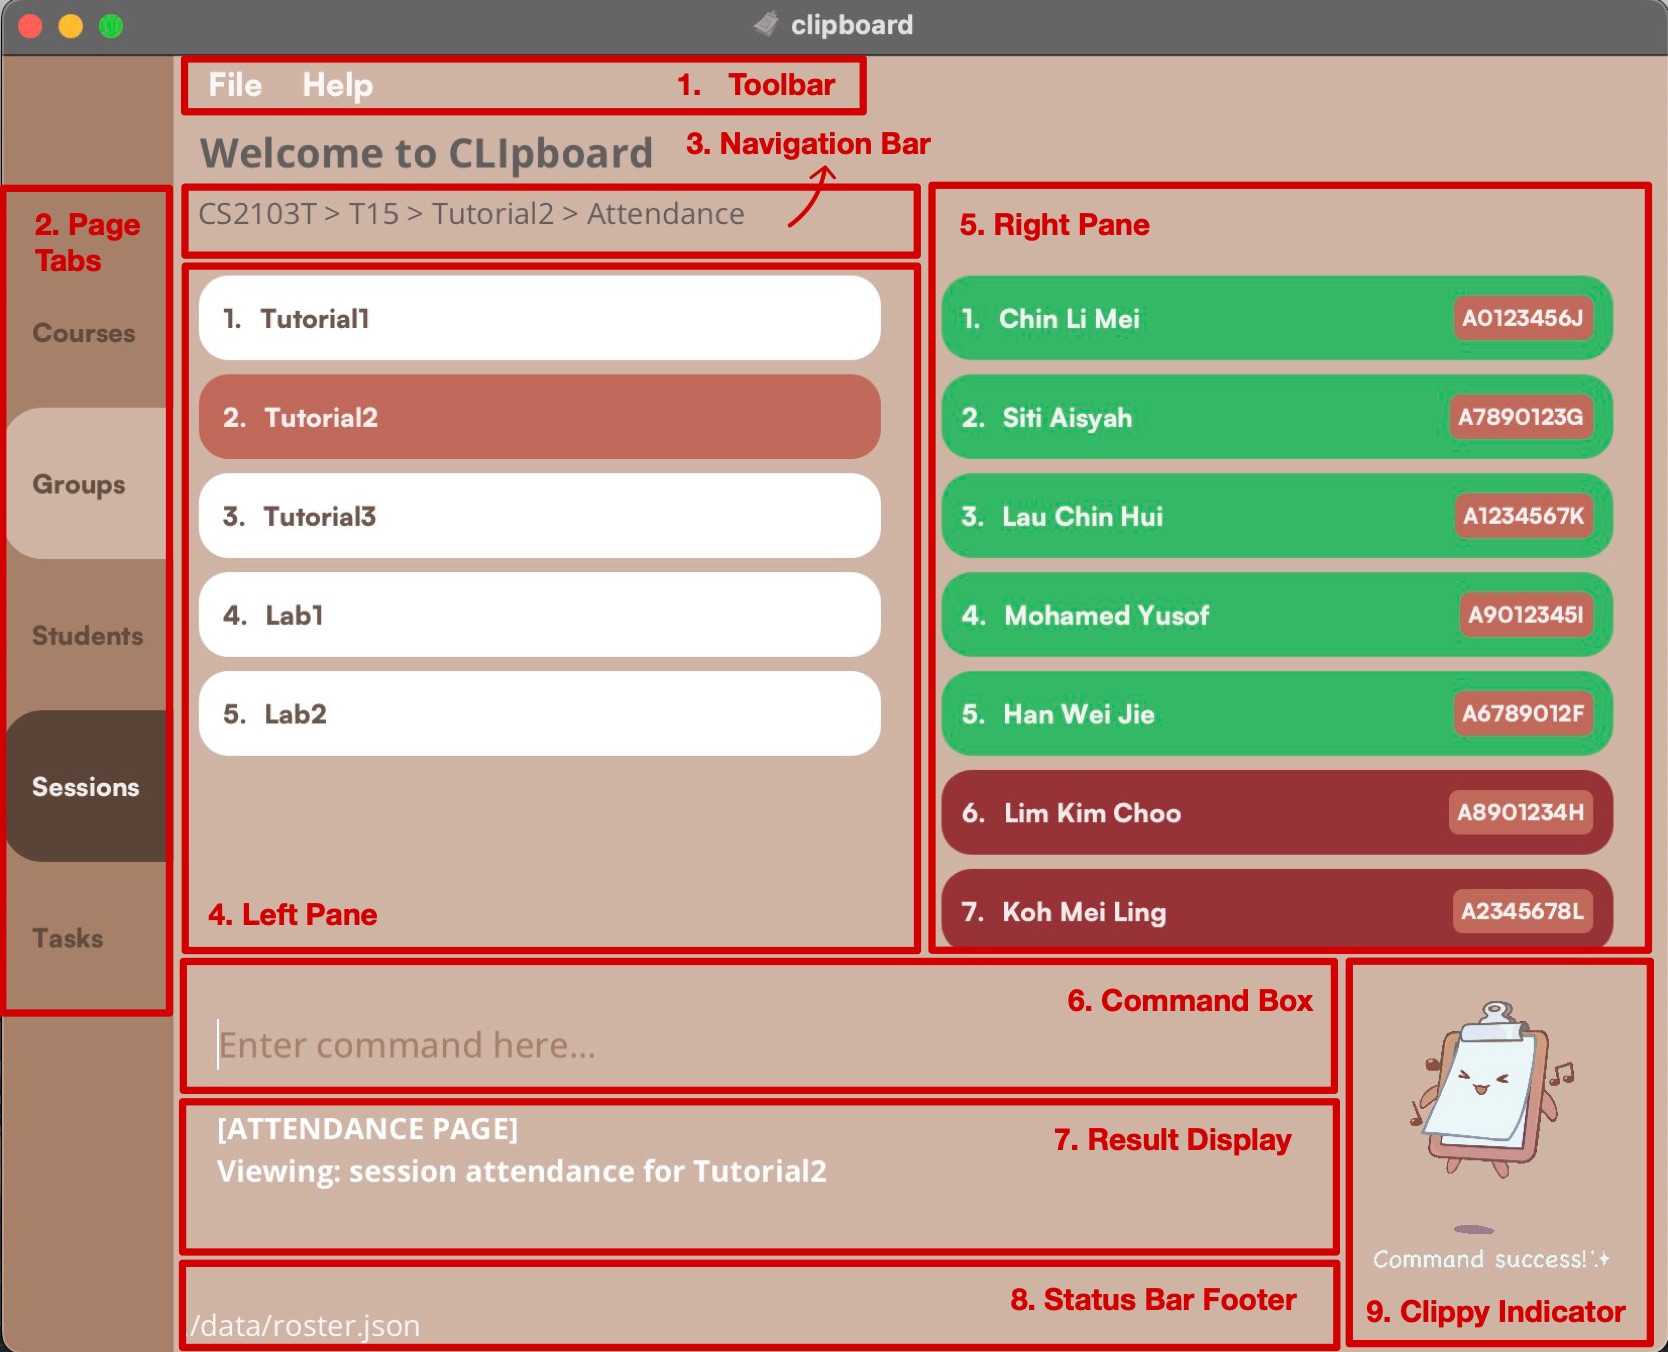
1. Toolbar
- To close the app, you can simply click on
File > Exit. - To open the help window, click on
Help > Help.
2. Page Tabs
- The
Page Tabsgive you a quick summary of the type of page you are on. - Refer to the Navigation Guide below to find out more about the different pages in CLIpboard.
3. Navigation Bar
- You can view your selected items in the
Navigation Bar.
4. Left Pane
- This is where you will see your lists of
Courses,Groups,Students,Sessions, andTasks.
5. Right Pane
- The
Right Panewill appear when you are on theAttendance PageorTask Page. It will show your list of students so you can mark their attendance or assign them a grade.
6. Command Box
- Type your commands here!
7. Result Display
- After entering a command, you can view it’s status and feedback in the
Result Display. - If your command fails, you will also find help messages here.
8. Status Bar Footer
- The
Status Bar Footerdisplays the file path of the data file used by CLIpboard to store or load your information.
9. CLIppy Indicator
- The
CLIppy Indicatorhelps you know whether you have entered a valid command. If the command is valid, CLIppy will be happy. Otherwise, CLIppy will be sad.
Navigation
Navigating between pages is made effortless with CLIpboard’s intuitive navigation commands.
Simply choose from a selection of select, back, session, or task commands.
Here’s a handy navigation map to get around CLIpboard.
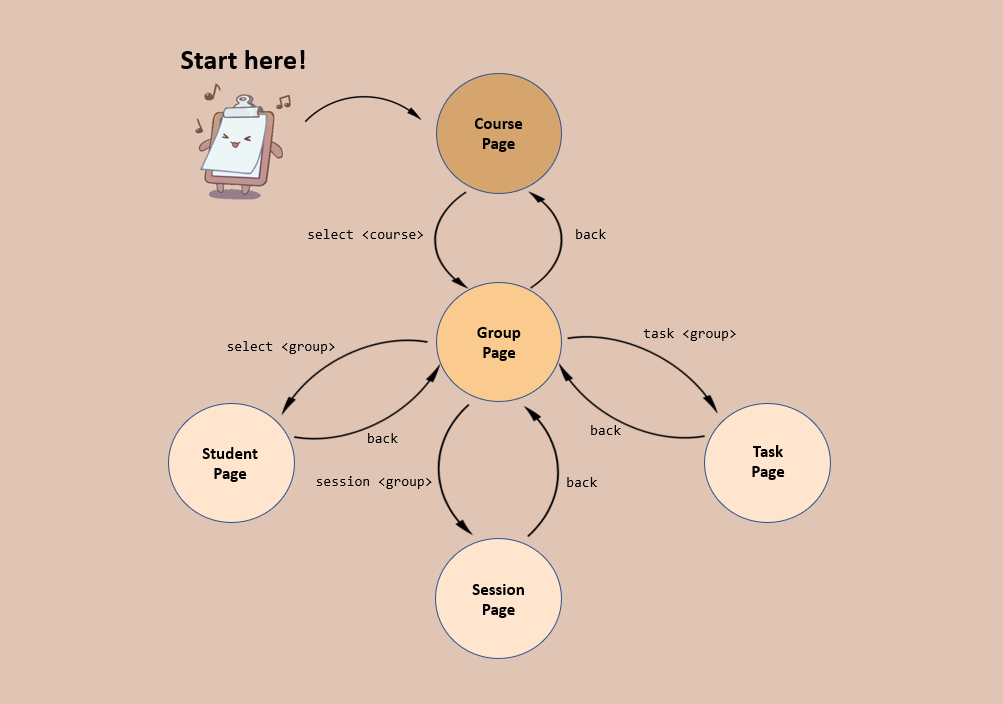
Here’s a hypothetical workflow that might help you better understand the figure above:
Say you wish to assign the grades for a task in one of your tutorial groups.
- You’ll first start on the
Course Page. - Enter the command
select 1to select the first course in the course list. You’ll then be brought to theGroup Pageto view the groups of your selected course. - You see now that the group you wish to select is the second group in the list, so you enter the command
task 2, and you’ll be brought to theTask Pageof your selected group. Here, you can choose from the tasks that are available, and subsequently enter the grades for your individual students.
Now, you wish to work on something else, like marking the attendance for another group.
- From where we left off, simply enter the command
backand you’ll be brought back to theGroup Page. - From here, you can use
session 4to view theSession Pageof the fourth group, and you can then mark their attendance for your selected session.
Features
Here is a list of amazing features that CLIpboard supports:
-
General Features:
-
Showing the home page:
home -
Going back to the previous page:
back -
Undoing the last command you did:
undo -
Help:
help -
Scrolling through command history:
UPorDOWNarrow key -
Clearing all entries:
clear -
Exiting the program:
exit
-
Showing the home page:
-
Managing Courses:
-
Adding a course:
add course -
Deleting a course:
delete course -
Editing a course:
edit course -
Selecting a course to display its Group Page:
select -
Finding a course:
find course
-
Adding a course:
-
Managing Groups:
-
Adding a group:
add group -
Deleting a group:
delete group -
Editing a group:
edit group -
Selecting a group to display its Student Page:
select -
Displaying sessions of a group:
session -
Displaying tasks of a group:
task -
Finding a group:
find group
-
Adding a group:
-
Managing Students:
-
Adding a student:
add student -
Deleting a student:
delete student -
Editing a student:
edit student -
Copying a student's email:
copy -
Finding students by name or student ID:
find student -
Sorting a list of students:
sort -
Display a student’s information:
select -
Adding or deleting a remark:
remark -
Uploading a student’s photo:
upload -
Display a summary of a student’s attendance:
attendance
-
Adding a student:
-
Managing Sessions:
-
Adding a session:
add session -
Deleting a session:
delete session -
Editing a session:
edit session -
Selecting a session to start attendance-taking:
select -
Finding a session:
find session
-
Adding a session:
-
Managing Attendance:
-
Marking students as present:
mark -
Marking students as absent:
unmark -
View the overall attendance of a session:
attendance
-
Marking students as present:
-
Managing Tasks:
-
Adding a task:
add task -
Deleting a task:
delete task -
Editing a task:
edit task -
Selecting a task to assign grades:
select -
Finding a task:
find task
-
Adding a task:
-
Managing Grades:
-
Assigning a grade:
assign
-
Assigning a grade:
Commands
Features in CLIpboard are supported by commands. Commands are like giving instructions to CLIpboard on what to do.
A typical command would look like this:
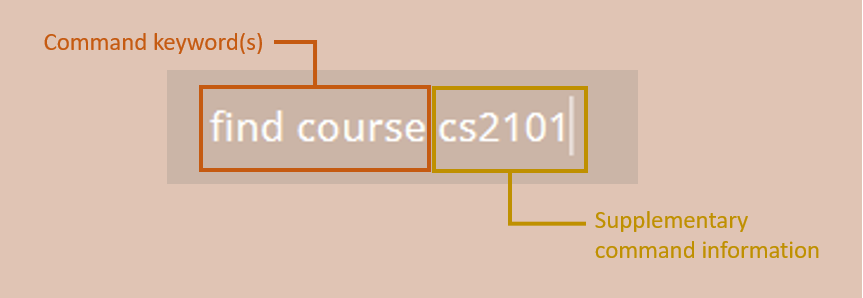
Command keyword(s): Typically 1 or 2 words, they specify the type of action for CLIpboard to execute.
Supplementary command information: These provide additional context about a command you wish to execute. Conventionally, these are referred to as “arguments” or “parameters”.
Putting it all together for the above example, find course would tell CLIpboard that you’re looking for a course, and “cs2101” tells CLIpboard which specific course you’re looking for.
![]() Caution:
Caution:
- If a command expects a parameter to be input only once, but multiple instances of it are included, only the last occurrence of the parameter will be taken.
- e.g. if you specify
p/12341234 p/56785678, onlyp/56785678will be taken.
- e.g. if you specify
- Extraneous parameters for commands that do not expect any parameters will be ignored.
- e.g. if you input the command
help 123, CLIpboard will interpret it simply ashelp.
- e.g. if you input the command
Understanding Command Formats
To help you understand how CLIpboard recognises commands, these are some of the conventions used in this guide when specifying command formats.
-
Supplementary command information: These are represented in uppercase and enclosed by angle brackets (
<>).
- e.g. in
add course <COURSE>,<COURSE>is a parameter.<COURSE>can be replaced with a course code to form the commandadd course CS2103T.
- e.g. in
-
Square brackets (
[]): Parameters in square brackets are optional.
- e.g If the parameters are specified as
[n/<NAME>] [p/<PHONE_NUMBER>], omitting these parameters are acceptable.
- e.g If the parameters are specified as
-
Elipses (
…): Parameters postfixed by…can have multiple inputs.
- e.g.
mark <INDEX>…can be used asmark 1ormark 1,2,3etc.
- e.g.
-
Index: CLIpboard displays items like courses and groups as numbered lists. The index of an item in the list might be required as a parameter for some commands.
- e.g. if the specified command format is
delete course <INDEX>, and you enterdelete course 3, CLIpboard will delete the third course in the course list.
- e.g. if the specified command format is
-
Multiple Parameters: Some commands require multiple parameters. In such cases, each parameter would require a specific corresponding prefix to denote the type of information it is.
- e.g When adding a student, there may be multiple pieces of information tied to a student.
Thus, a typical command for adding a student might look like
add student n/john doe p/12345678. In this command,- The prefix
n/inn/john doetells CLIpboard that this parameter is the student’s name. - The prefix
p/inp/12345678tells CLIpboard that this parameter is the student’s phone number.
- The prefix
- e.g When adding a student, there may be multiple pieces of information tied to a student.
Thus, a typical command for adding a student might look like
-
Parameters can be input in any order
- If the command format specifies the required parameters as
n/NAME p/PHONE_NUMBER, an alternative format likep/PHONE_NUMBER n/NAMEis also acceptable.
- If the command format specifies the required parameters as
General Features
General features are features that may be used anywhere on CLIpboard, regardless of what page you’re on.
Showing the home page: home
Brings you to the home page, which is the Course Page of CLIpboard.
Command Format:
home
Going back to the previous page: back
Brings you back to the previous page you were at.
Command Format:
back
Undoing the last command you did: undo
Because everyone makes mistakes.
undo up to 5 previous commands.
Command Format:
undo
Help: help
When you’re feeling lost or unsure of how to do something, use this command to open the help window. There, you can see a list of available commands on your current page, as well as a link to this User Guide.
Command Format:
help
Clearing all entries: clear
Clears all entries in the list of the current page. Useful for when you’ve ended the curriculum and you wish to delete all data.
Command Format:
clear
undo command!
undo limit (undo only works up to 5 previous commands).
Scrolling through command history: UP or DOWN arrow key
You’re feeling lazy and the commands you need to run are only slightly different from each other. No fret.
- You can scroll through your past commands using the
UPorDOWNarrow keys. - You may then use the
LEFTorRIGHTarrow keys to edit your previous command. - Finally, press
ENTERto execute the command.
Exiting the program: exit
Goodbye! We hope you’ve enjoyed using CLIpboard 😄
Command Format:
exit
Managing Courses
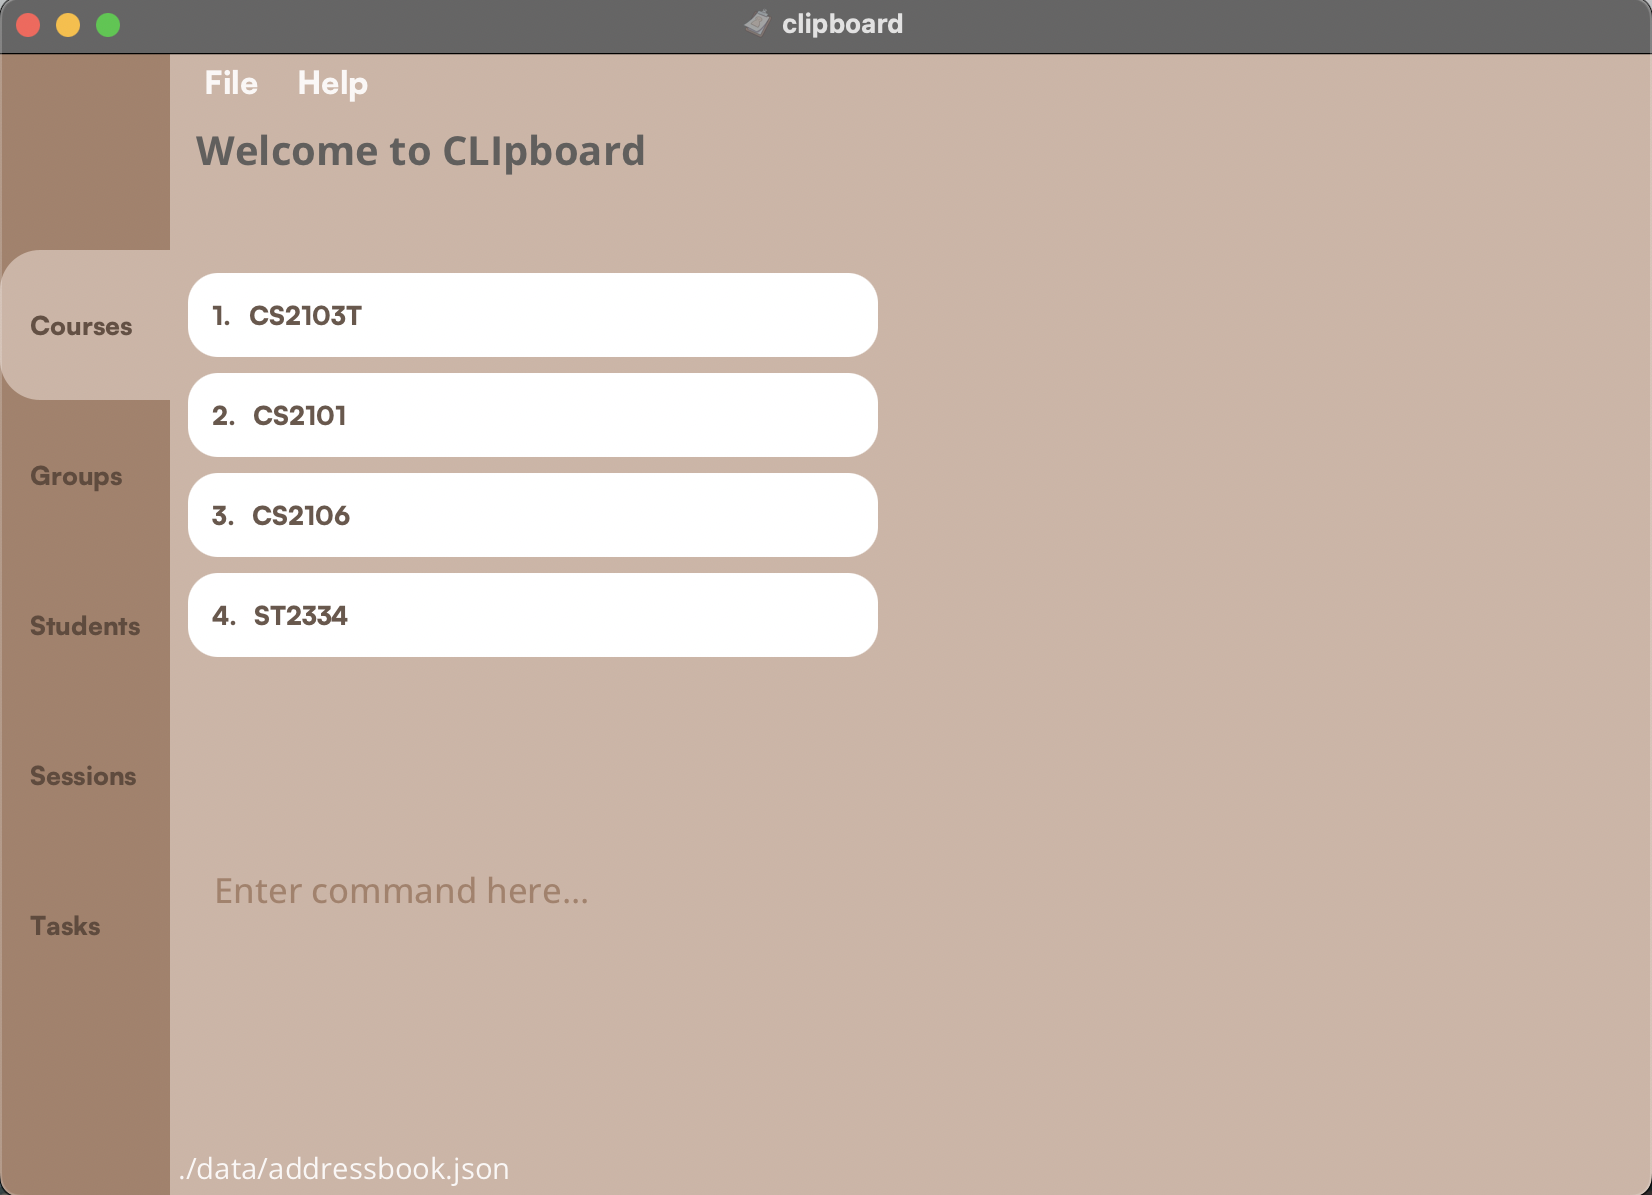
In the following sections, you will find the features that are available to you on the Course Page.
A Course Page typically looks like this:
Adding a course: add course
If you’re teaching a new course, you can use this command to add it to the Course Page.
Command Format:
add course <COURSE>
![]() Note:
Note:
- Adding courses with the same course code is not possible.
- Course codes can contain alphanumeric and special characters. e.g. “AY2223S2-CS2103T”
- Course codes cannot contain white spaces.
- Course codes are case-sensitive. e.g. “CS2103T” and “cs2103t” are treated as different courses.
Examples:
-
add course CS2103Twill add a new course with course codeCS2103T -
add course CS2105will add a new course with course codeCS2105
Deleting a course: delete course
If you’re done teaching a course, you can remove it with this command.
Command Format:
delete course <INDEX>
Examples:
-
delete course 1will delete your first course listed in your course list.
Editing a course: edit course
Use this command to change the course code of an existing course.
Command Format:
edit course <INDEX> <NEW_COURSE_CODE>
Examples:
-
edit course 1 CS2106will rename your first course listed in your course list to “CS2106”.
Finding a course: find course
You can filter your course list to show only courses that contain specific keywords.
Command Format:
find course <KEYWORD> [<MORE_KEYWORDS>]
![]() Note:
Note:
- Keywords are case-insensitive. (e.g.
find course CS2103Tandfind course cs2103twill give you the same result) - Keywords are separated by spaces.
Example: If your course list contains 2 courses “CS2103T” and “CS2101”:
-
find course CSwill show “CS2103T”, “CS2101”. -
find course 03will show “CS2103T”.
Selecting a course: select
This command allows you to select a course and navigates you to its corresponding Group Page.
Command Format:
select <INDEX>
Examples:
-
select 1will display a list of groups from the first course.
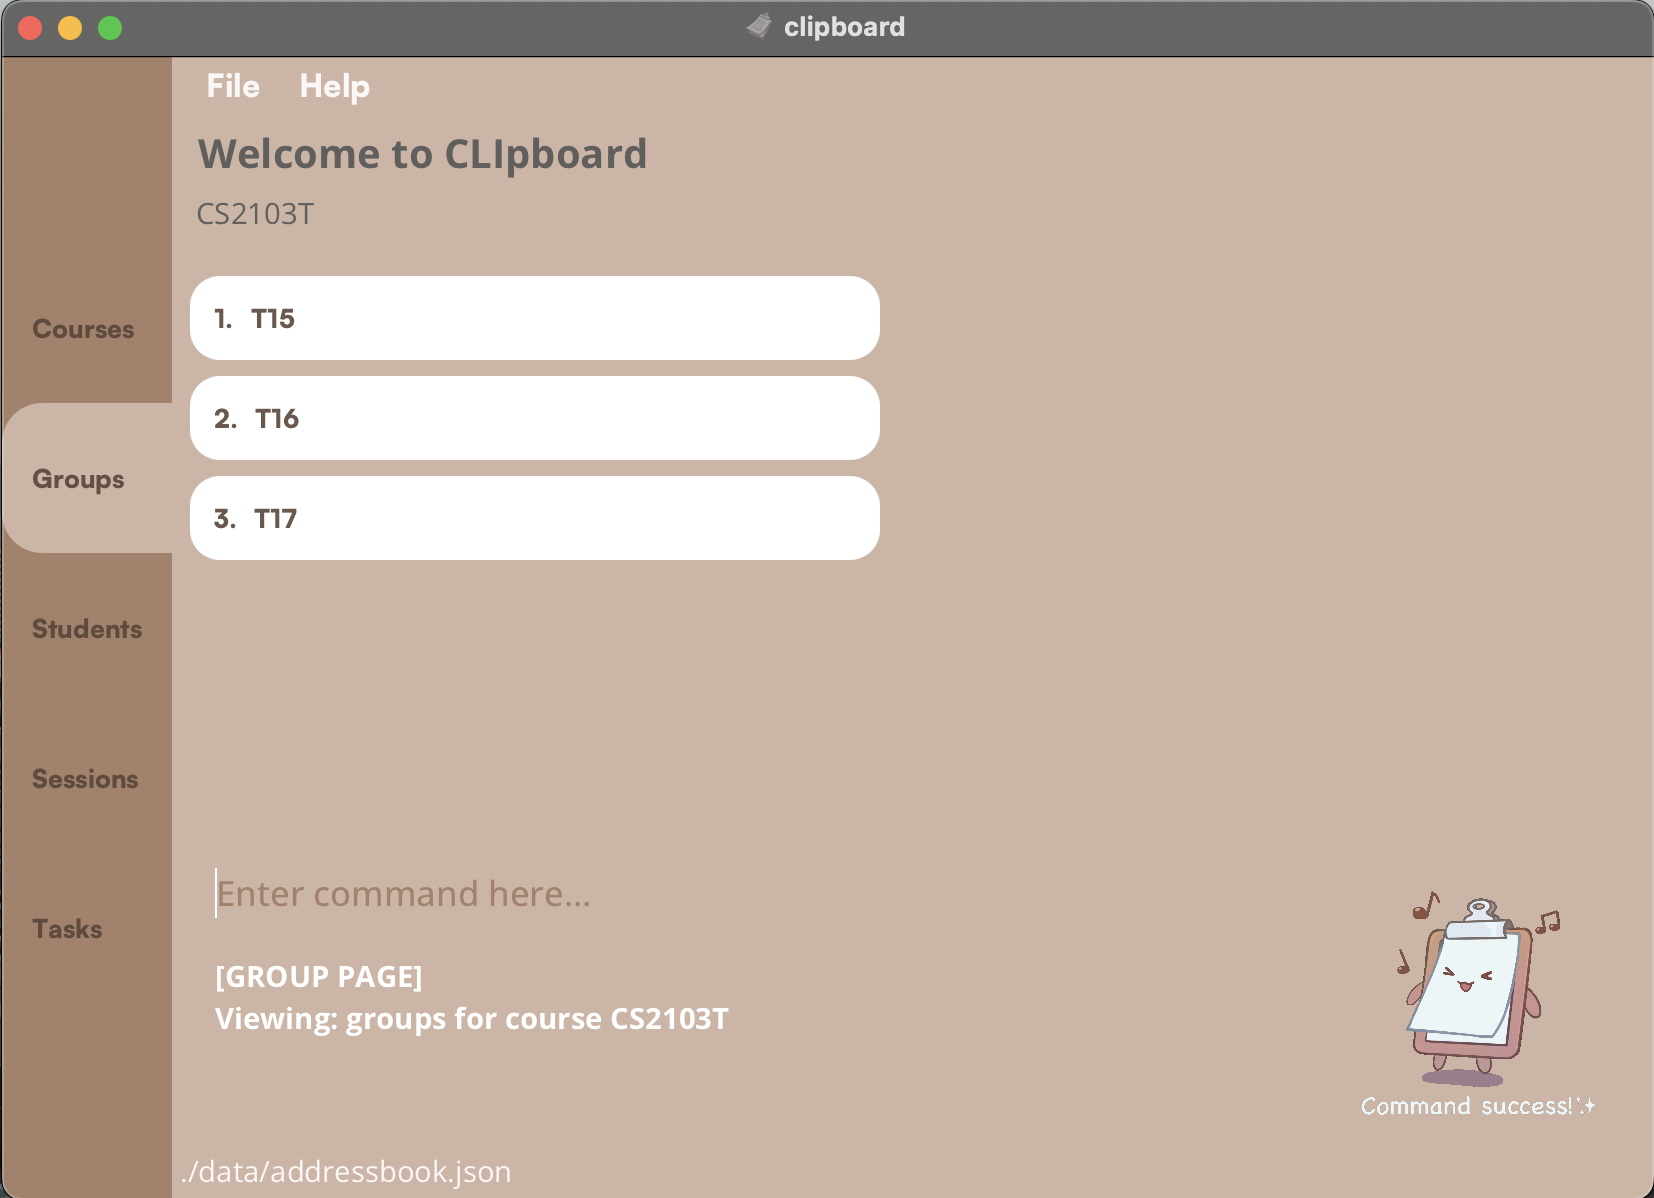
Managing Groups
In the following sections, you will find the features that are available to you on the Group Page.
A Group Page typically looks like this:
Adding a group: add group
Use this command to a new group to a course you’ve selected.
Command Format:
add group <GROUP>
![]() Note:
Note:
- Adding groups with the same group name is not possible.
- Group names can contain alphanumeric and special characters. e.g. “LO3-2”
- Group names cannot contain white spaces.
- Group names are case-sensitive. e.g. “t15” and “T15” are treated as different groups.
Examples:
-
add group T15will add a new group with group nameT15 -
add group L08will add a new group with group nameL08
Deleting a group: delete group
This removes a group from your selected course.
Command Format:
delete group <INDEX>
Examples:
-
delete group 1will delete the first group listed in your group list.
Editing a group: edit group
Use this command to edit the name of an existing group.
Command Format:
edit group <INDEX> <NEW_GROUP_NAME>
Examples:
-
edit group 1 T16will rename the first group listed in your group list toT16.
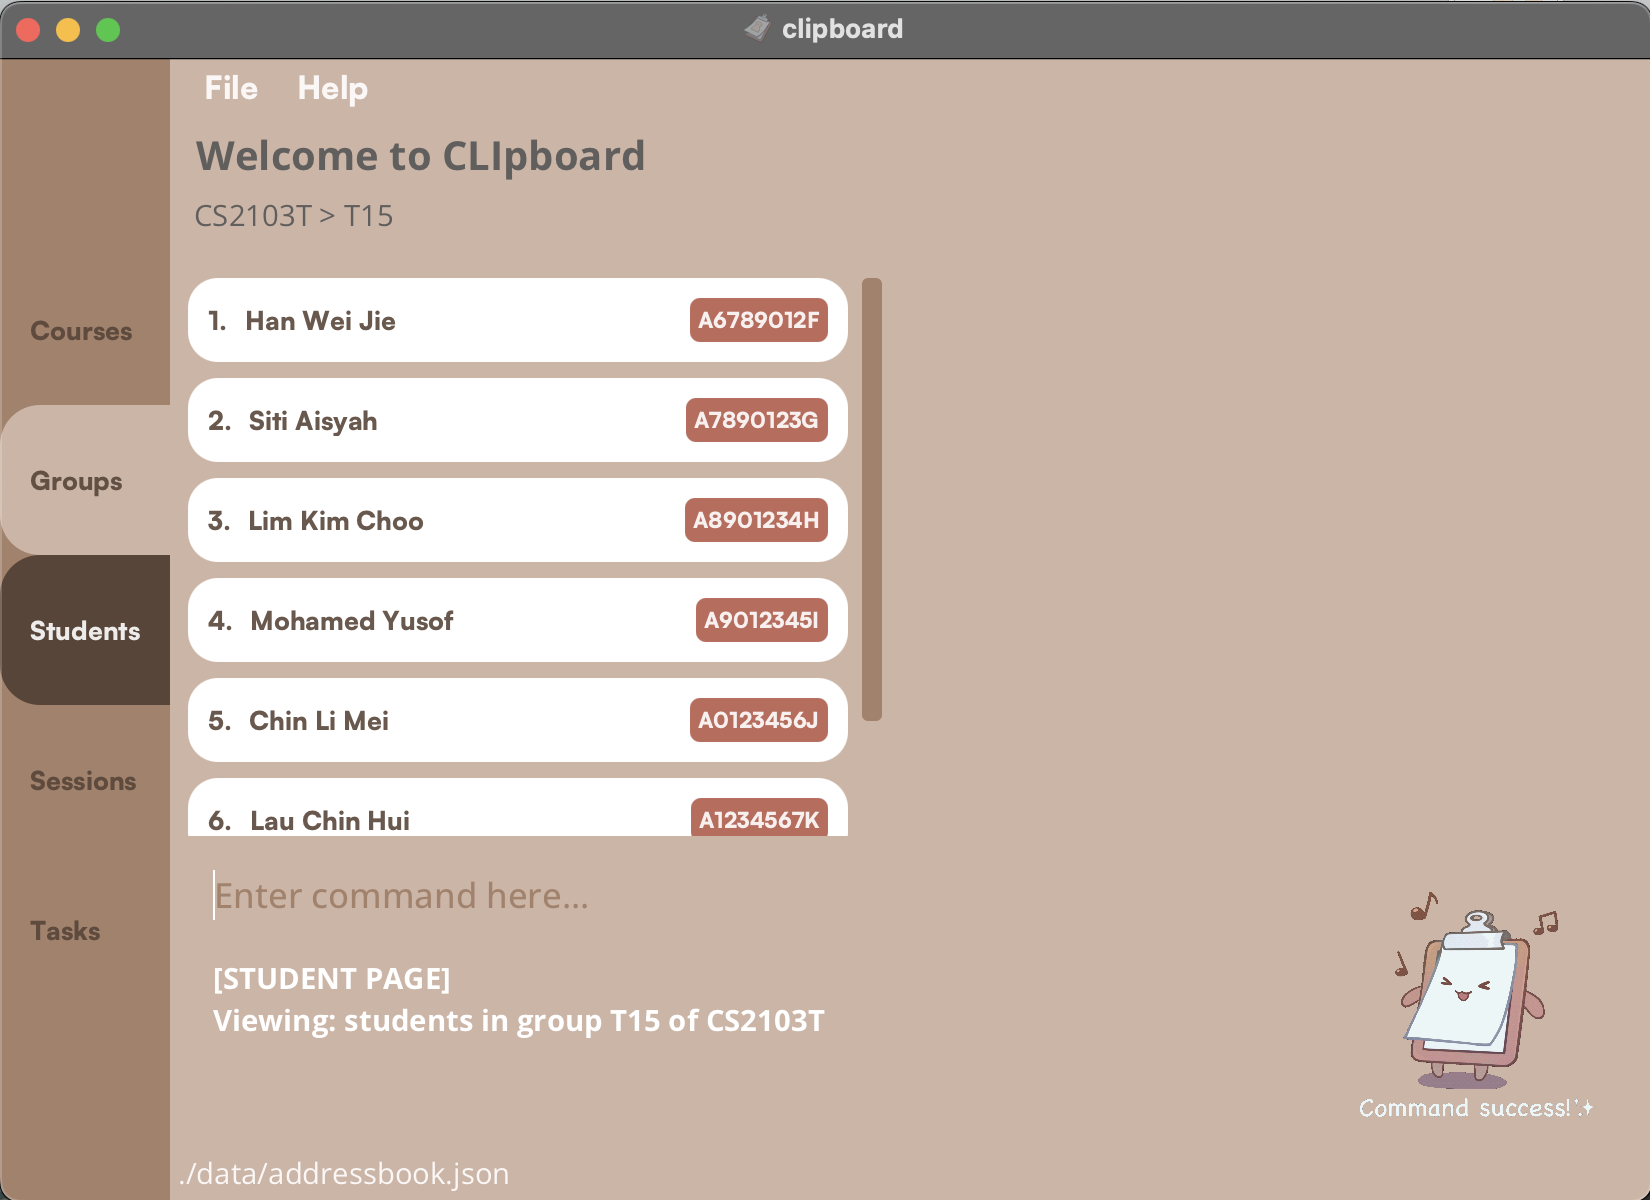
Selecting a group: select
This command allows you to select a group and navigates you to its corresponding Student Page.
Command Format:
select <INDEX>
Examples:
-
select 1will show you your list of students from the first group.
Displaying the Sessions of a Group: session
Use this command to view the sessions of a particular group.
Command Format:
session <INDEX>
Examples:
-
session 1will show you your list of sessions from the first group.
Displaying the Tasks of a Group: task
Use this command to view the tasks of a particular group.
Command Format:
task <INDEX>
Examples:
-
task 1will show you your list of tasks for the first group.
Finding a group: find group
You can filter your group list to show only groups that contain specific keywords.
Command Format:
find group <KEYWORD> [<MORE_KEYWORDS>]
![]() Note:
Note:
- Keywords are case-insensitive. (e.g.
find course T15andfind course t15will give you the same result) - Keywords are separated by spaces.
Examples:
-
find group 15returnsT15.
Managing Students
In the following sections, you will find the features that are available to you on the Student Page.
A Student Page typically looks like this:
Some commands for managing students require multiple parameters.
As described in Understanding Command Formats, these parameters would require specific prefixes to indicate the type of information they represent. There are also some restrictions on the inputs for these parameters.
Please refer to the table below
| Prefix | Prefix meaning | Input Restrictions |
|---|---|---|
| n/ | Name | Names should only contain alphanumeric characters and spaces, and it should not be blank. |
| p/ | Phone Number | Phone numbers should only contain numbers, and it should be at least 3 digits long. |
| e/ | Emails should be of the format local-part@domain and adhere to the following constraints: 1. The local-part should only contain alphanumeric characters and these special characters, excluding the parentheses, (+_.-). The local-part may not start or end with any special characters. 2. This is followed by a ‘@’ and then a domain name. The domain name is made up of domain labels separated by periods. The domain name must: - end with a domain label at least 2 characters long - have each domain label start and end with alphanumeric characters - have each domain label consist of alphanumeric characters, separated only by hyphens, if any. |
|
| sid/ | Student Identification (ID) | Student IDs should be alphanumeric with no special characters. |
Adding a student: add student
Use this command to add a new student to a selected group.
Command Format:
add student n/<NAME> p/<PHONE_NUMBER> e/<EMAIL> sid/<STUDENT_ID>
![]() Note:
Note:
- Adding students with the same student id is not possible.
- The same student can exist in multiple groups. For example, a student can be in both tutorial group “T1” and a project group “Team15” at the same time.
Examples:
add student n/Tan Wei Xuan p/81776544 e/twx@example.com sid/A6788796Fadd student n/Amirul Bin Othman p/98884417 e/amirul@example.com sid/A1324356G
Deleting a student: delete student
This removes a student from a selected group.
Command Format:
delete student <INDEX>
Examples:
-
delete student 1will delete your first student listed in your student list.
Editing a student: edit student
If your student has changed their phone number, or any other student information, you may edit it with this command.
Command Format:
edit student <INDEX> [n/<NAME>] [p/<PHONE_NUMBER>] [e/<EMAIL>] [sid/<STUDENT_NUMBER>]
![]() Note:
Note:
- At least one parameter
[n/<NAME>],[p/<PHONE_NUMBER>],[e/<EMAIL>]or[sid/<STUDENT_NUMBER>]must be provided.
undo command!
Examples:
-
edit student 1 n/John Doewill replace the name of your first student listed in your student list toJohn Doe. -
edit student 4 p/99887766 e/john@gmail.comwill replace the phone number and email of your fourth student listed in your student list with99887766andjohn@gmail.comrespectively.
Copying a student’s email: copy
To quickly get the email of a student, use this command to copy a student’s email.
Then, simply use CTRL+V or Right-Click > Paste to paste their email.
Command Format:
copy <INDEX>
Examples:
-
copy 1will copy the email of your first student in your student list to your clipboard.
Finding students by name or student ID: find student
You can filter your student list to show only students whose names or student IDs contain any of the given keywords.
Command Format:
find student <KEYWORD> [<MORE_KEYWORDS>]
![]() Note:
Note:
- You can find students using either
nameorstudent IDfor the keyword(s). - Keywords are separated by spaces.
- Keywords are case-insensitive.
Examples:
-
find student JohnreturnsJohn. -
find student Alex YureturnsAlex Yeoh,Bernice Yu. -
find student A123returns students whose student ID containsA123, such asA123andA1234567X.
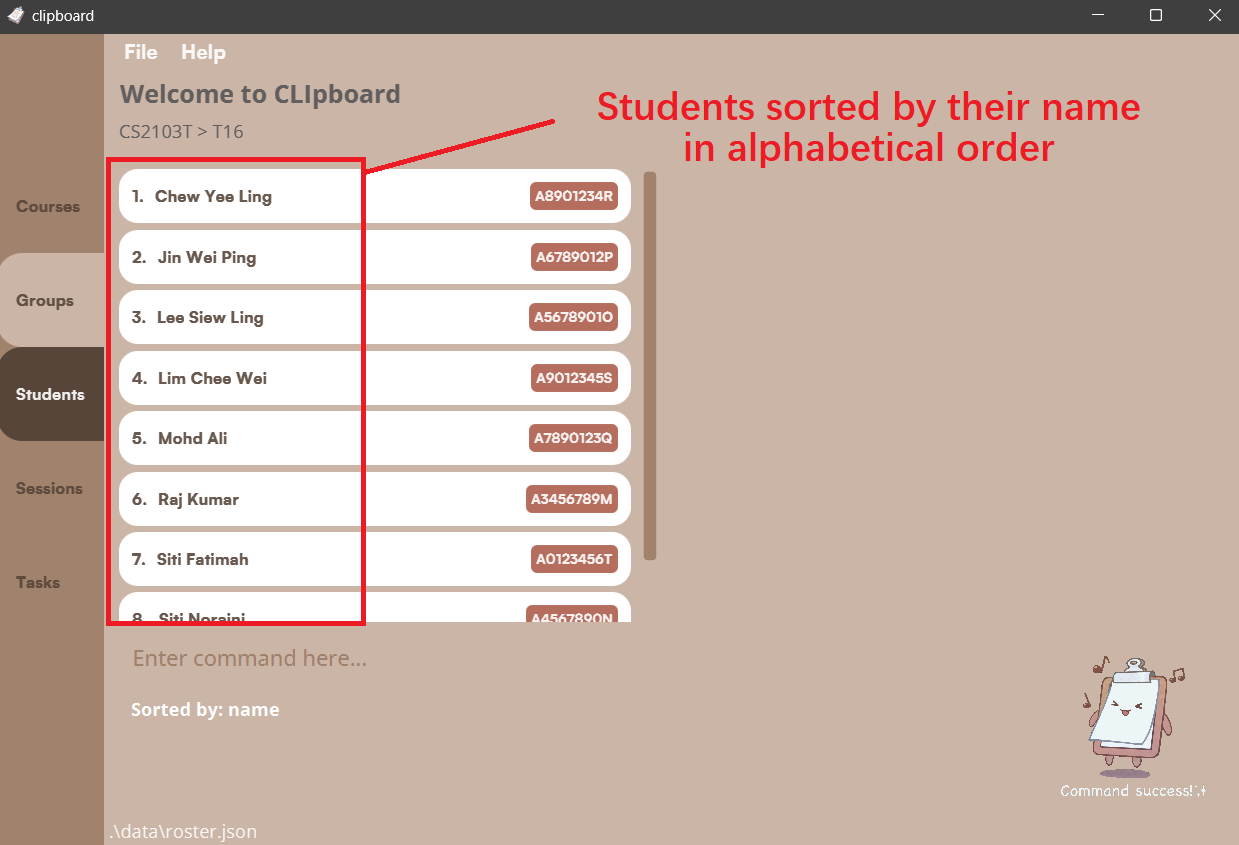
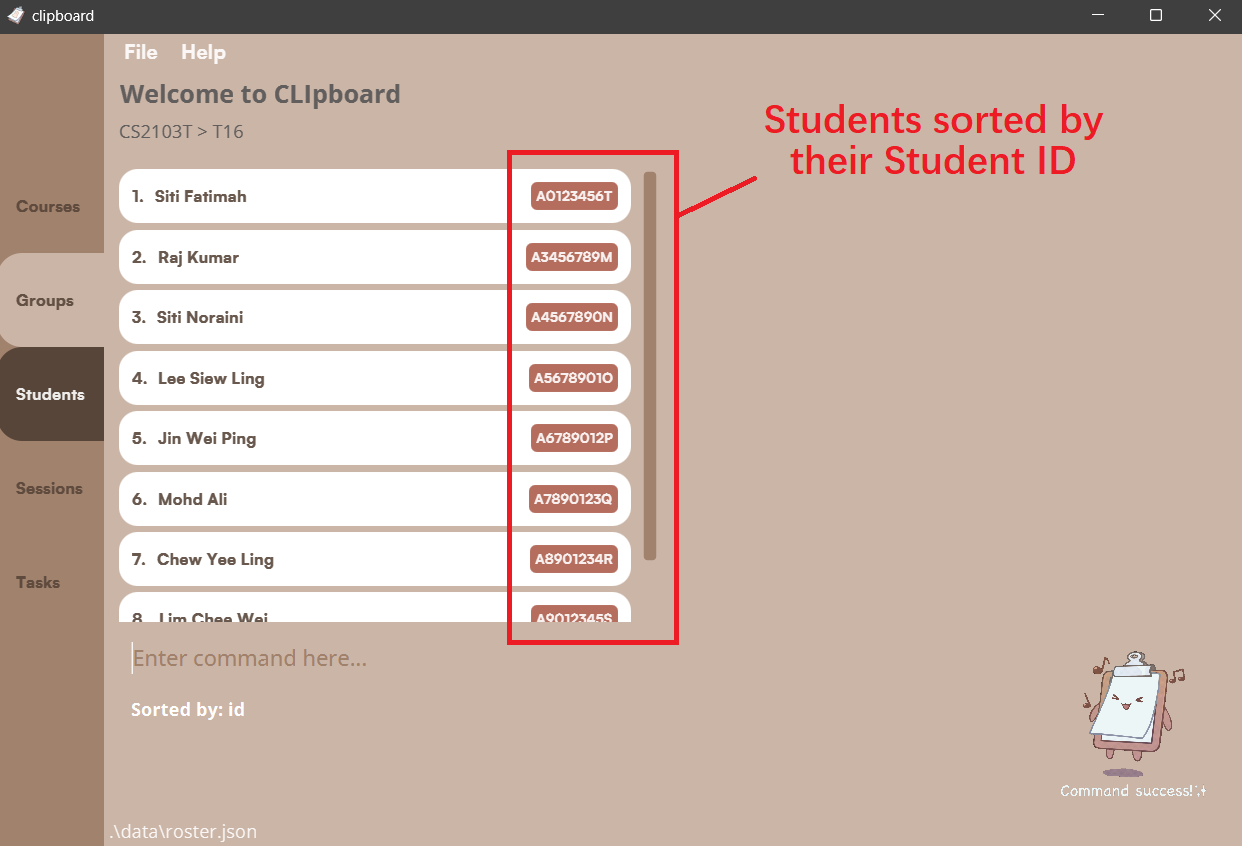
Sorting a list of students: sort
You can sort your students either by their names or their student ID.
Command Format:
sort <CATEGORY>
-
<CATEGORY>is eithernameorid
Examples:
-
sort namewill sort your list of students alphabetically according to name. -
sort idwill sort your list of students alphanumerically according to student ID.
Display a student’s information: select
This command allows you to select a student and display their full particulars. The selected student will be shown like this:
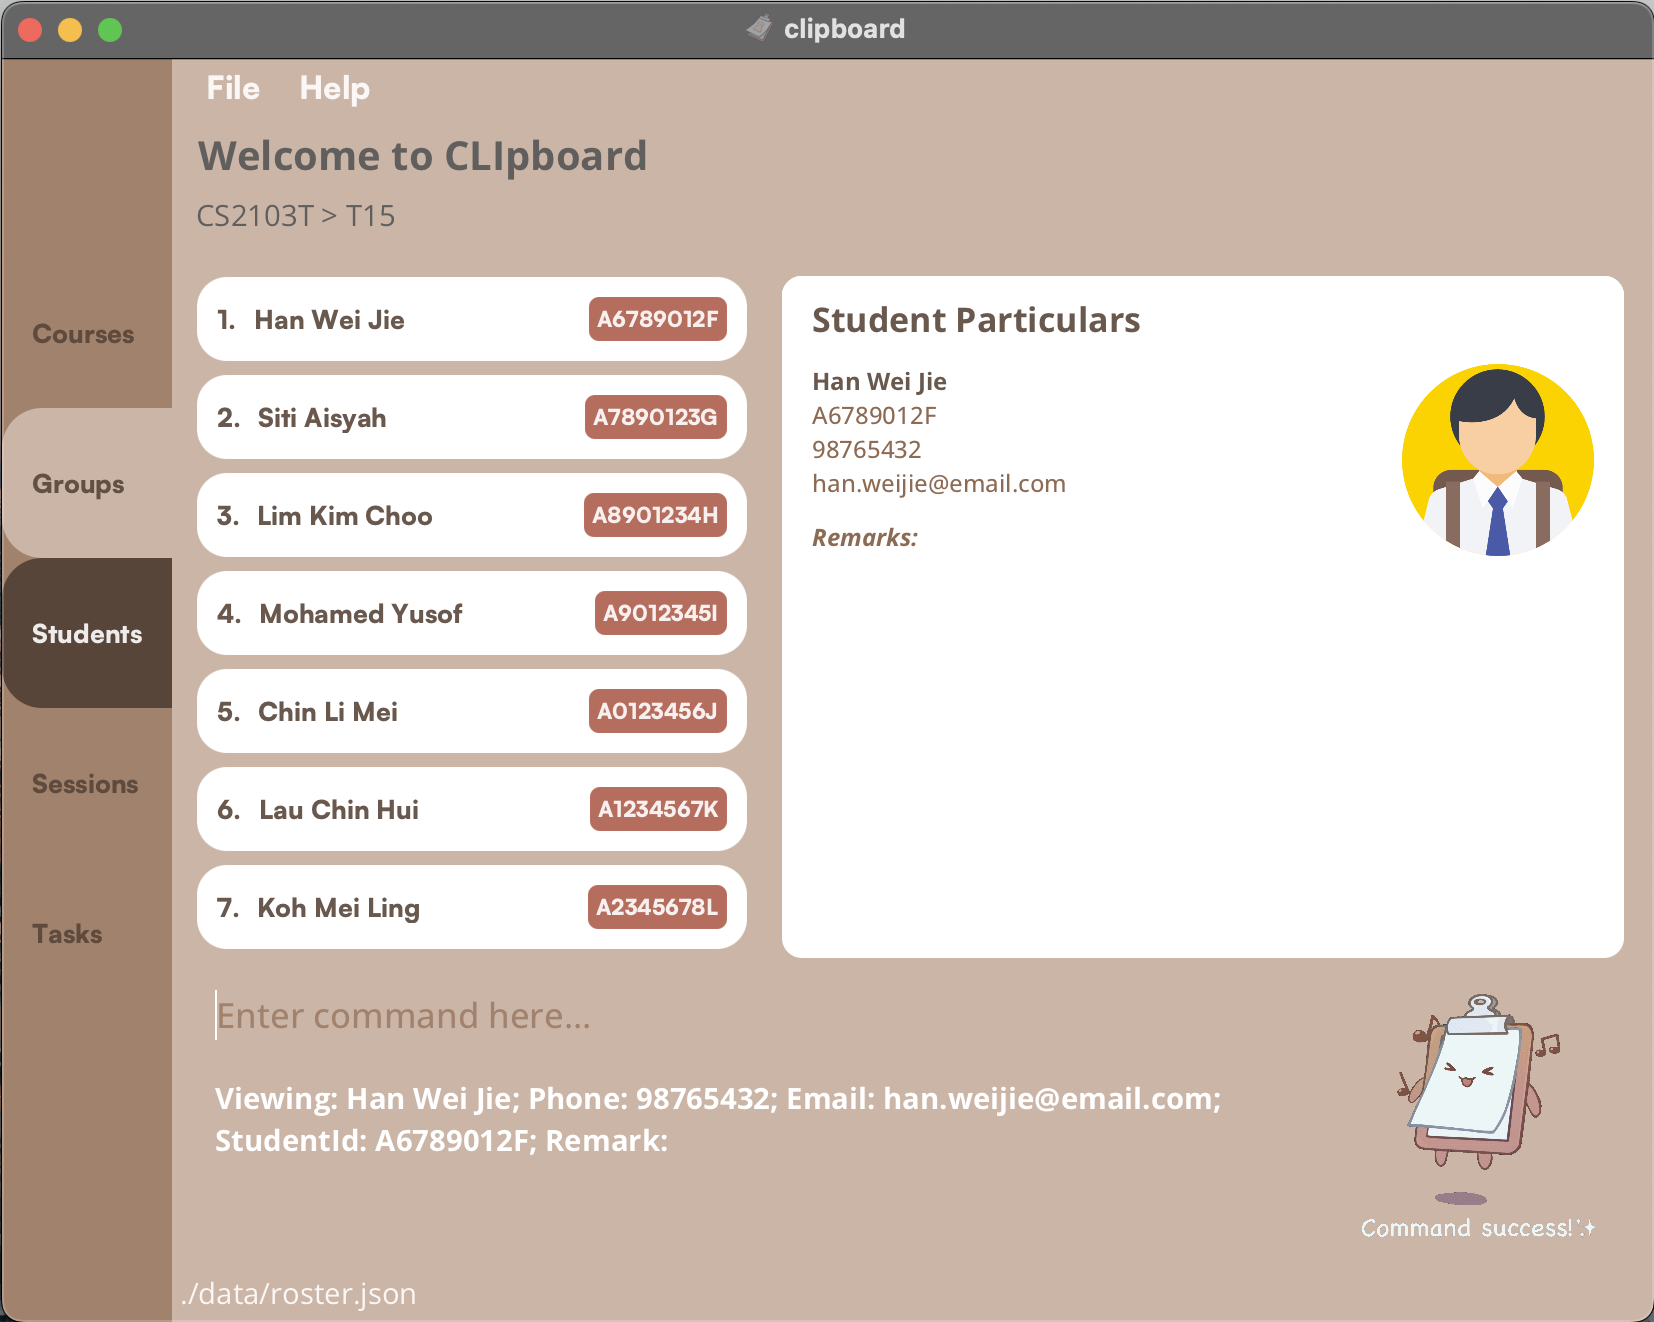
Command Format:
select <INDEX>
Examples:
-
select 1will select your first student in your student list and displays their particulars.
Adding or deleting a remark: remark
You can use this command to add, edit or remove remarks from a student.
Command Format for Adding/Editing a remark:
remark <INDEX> <REMARK>
Command Format for deleting a remark:
remark <INDEX>
undo command!
Examples:
-
remark 1 Loves watching Sci-Fi movieswill add a remark of “Loves watching Sci-Fi movies” to your first student. listed in the student list. -
remark 2will delete the remark from the second student listed in the student list.
Uploading a student’s photo: upload
You can upload an image to be displayed as a student’s profile picture.
Command Format:
upload <LOCAL_FILE_PATH>
![]() Note:
Note:
- For an image to be displayed as the profile picture of a student in CLIpboard, the image must be named after the said
student’s student ID and must be a
.pngfile (i.e.<STUDENT_ID>.png) - If a new image is uploaded to CLIpboard, and it has the same name as an existing image, the existing image will be replaced.
![]() Tip:
Tip:
- If you’re on Windows, you can get the file path of a file by clicking it with
SHIFT + Right-Click > 'Copy as Path'. - You can upload the student images before actually adding the student. CLIpboard will still match the images to the student once they’re added (if the file name matches their student ID).
Examples:
-
upload C:/Users/AlexYeoh/Desktop/A0123456X.pngwill uploadA0123456X.pngto the CLIpboard data folder and the photo will be displayed in the profile of student with student IDA0123456X
Viewing a student’s attendance throughout the course: attendance
After selecting a student, you can use attendance to view a summary of their attendance like this:

Command Format:
attendance
![]() Note: To edit a student’s attendance for a particular session, you can navigate to their Attendance Page.
Note: To edit a student’s attendance for a particular session, you can navigate to their Attendance Page.
Managing Sessions
In the following sections, you will find the features that are available to you on the Session Page.
A Session Page typically looks like this:
Adding a session: add session
This adds a new session to your selected group.
Command Format:
add session <SESSION>
![]() Note:
Note:
- Adding sessions with the same session name is not possible.
- Session names can contain alphanumeric and special characters. e.g. “T15-Session-1.2”
- Session names cannot contain white spaces.
- Session names are case-sensitive. e.g. “session1” and “SESSION1” are treated as different sessions.
Examples:
add session Tutorial4add session Lab3
Deleting a session: delete session
This removes a session from your selected group.
Command Format:
delete session <INDEX>
Examples:
-
delete session 1will delete the first session listed in the session list panel of CLIpboard.
Editing a session: edit session
You can edit the name of an existing session in your session list.
Command Format:
edit session <INDEX> <NEW_SESSION_NAME>
Examples:
-
edit session 1 Tutorial1will rename your first session listed toTutorial1.
Finding a session: find session
You can filter your session list to show only sessions that contain specific keywords.
Command Format:
find session <KEYWORD> [<MORE_KEYWORDS>]
![]() Note:
Note:
- Keywords are case-insensitive. (e.g.
find session tutorial1andfind session Tutorial1will give you the same result) - Keywords are separated by spaces.
Examples:
-
find session 1returnsTutorial1andLab1.
Selecting a session to start attendance-taking: select
This command allows you to select a session and view its student attendance.
Command Format:
select <INDEX>
Examples:
-
select 1will return a list of your students from the first session.
Managing the attendance of a session
In the following sections, you will find the features that are available to you after you have selected a session while on the Session Page.
Your current page would look similar to this:

Marking students as present: mark
This marks your selected students’ attendance as present for your selected session.
Command Format:
mark <INDEX>
mark <INDEX>...
Examples:
-
mark 1will mark the first student as present. -
mark 2,4,5,6will mark the second, fourth, fifth and sixth students as present.
Marking students as absent: unmark
This marks your selected students’ attendance as absent for your selected session.
Command Format:
unmark <INDEX>
unmark <INDEX>...
Examples:
-
unmark 1will mark your first student as absent. -
unmark 2,3,4will mark your second, third and fourth students as absent.
View the overall attendance of a session: attendance
You can view the overall attendance of a session that you’ve selected, which will be shown like this:
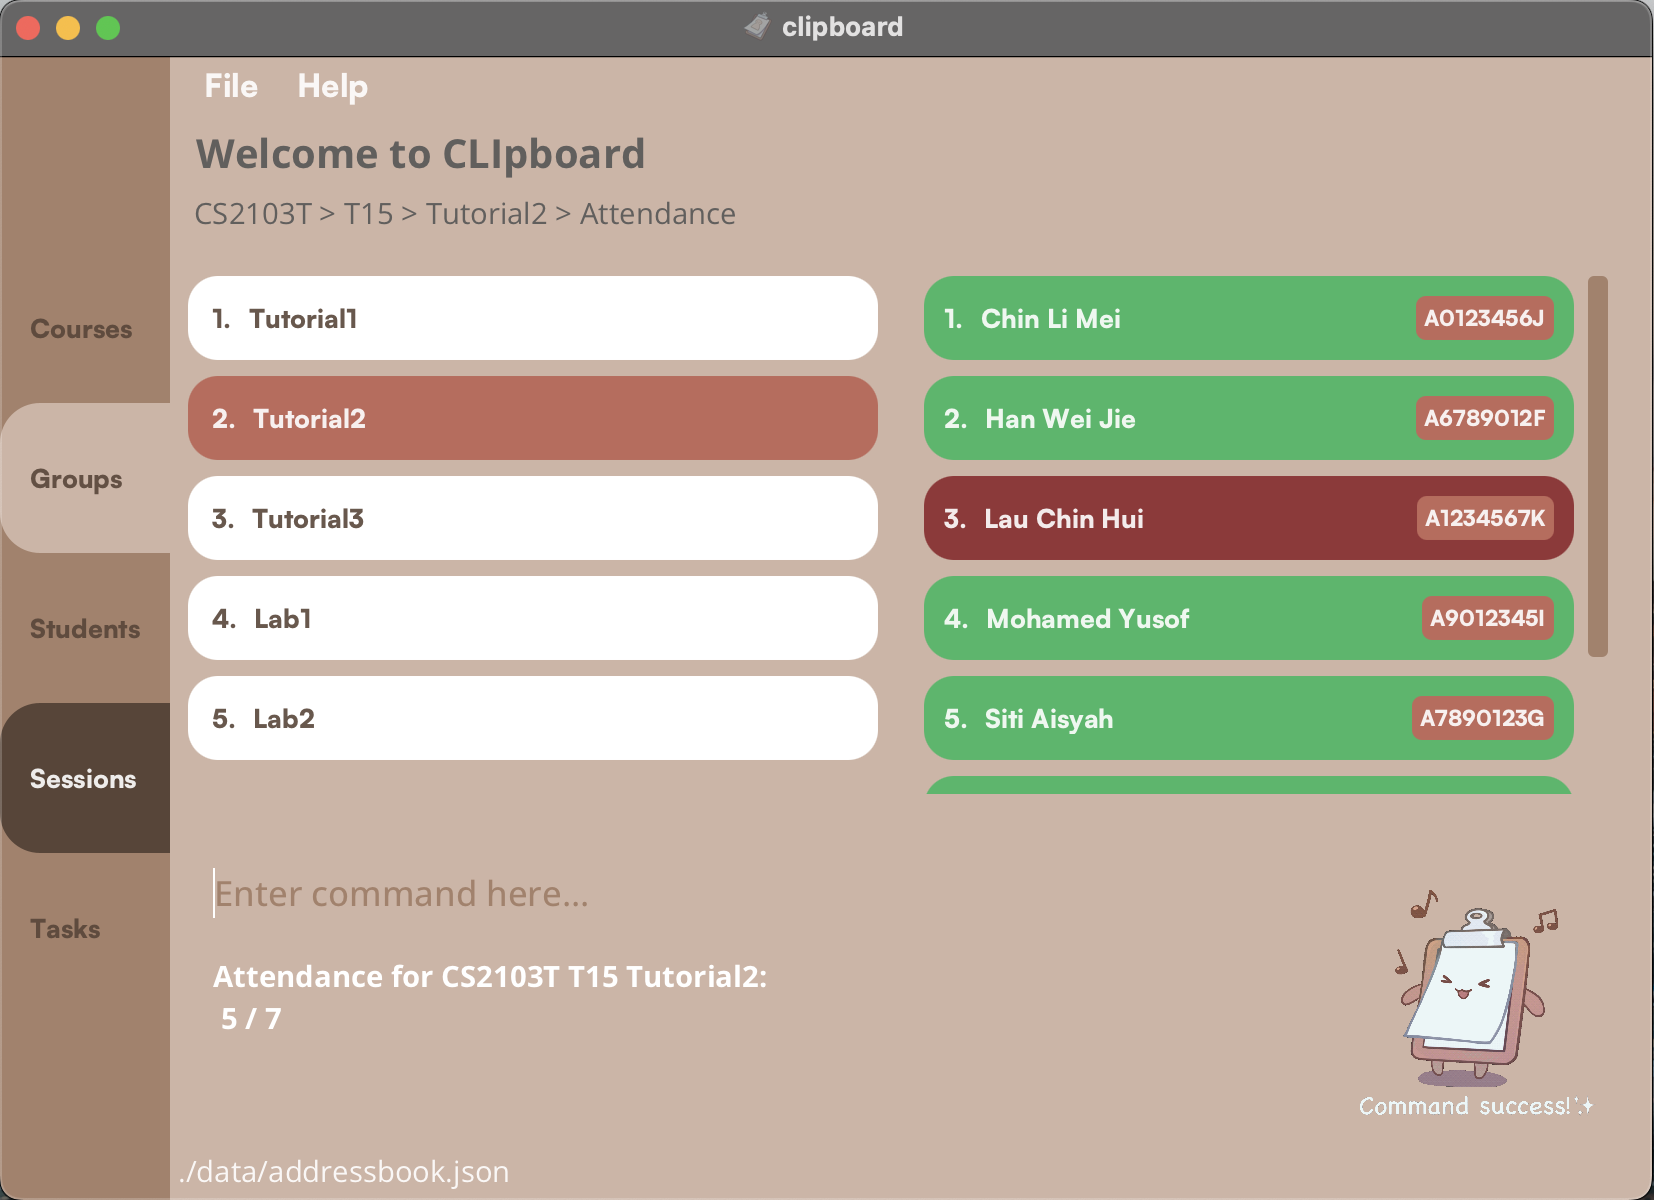
Command Format:
attendance
Managing Tasks
In the following sections, you will find the features that are available to you on the Task Page.
A Task Page typically looks like this:
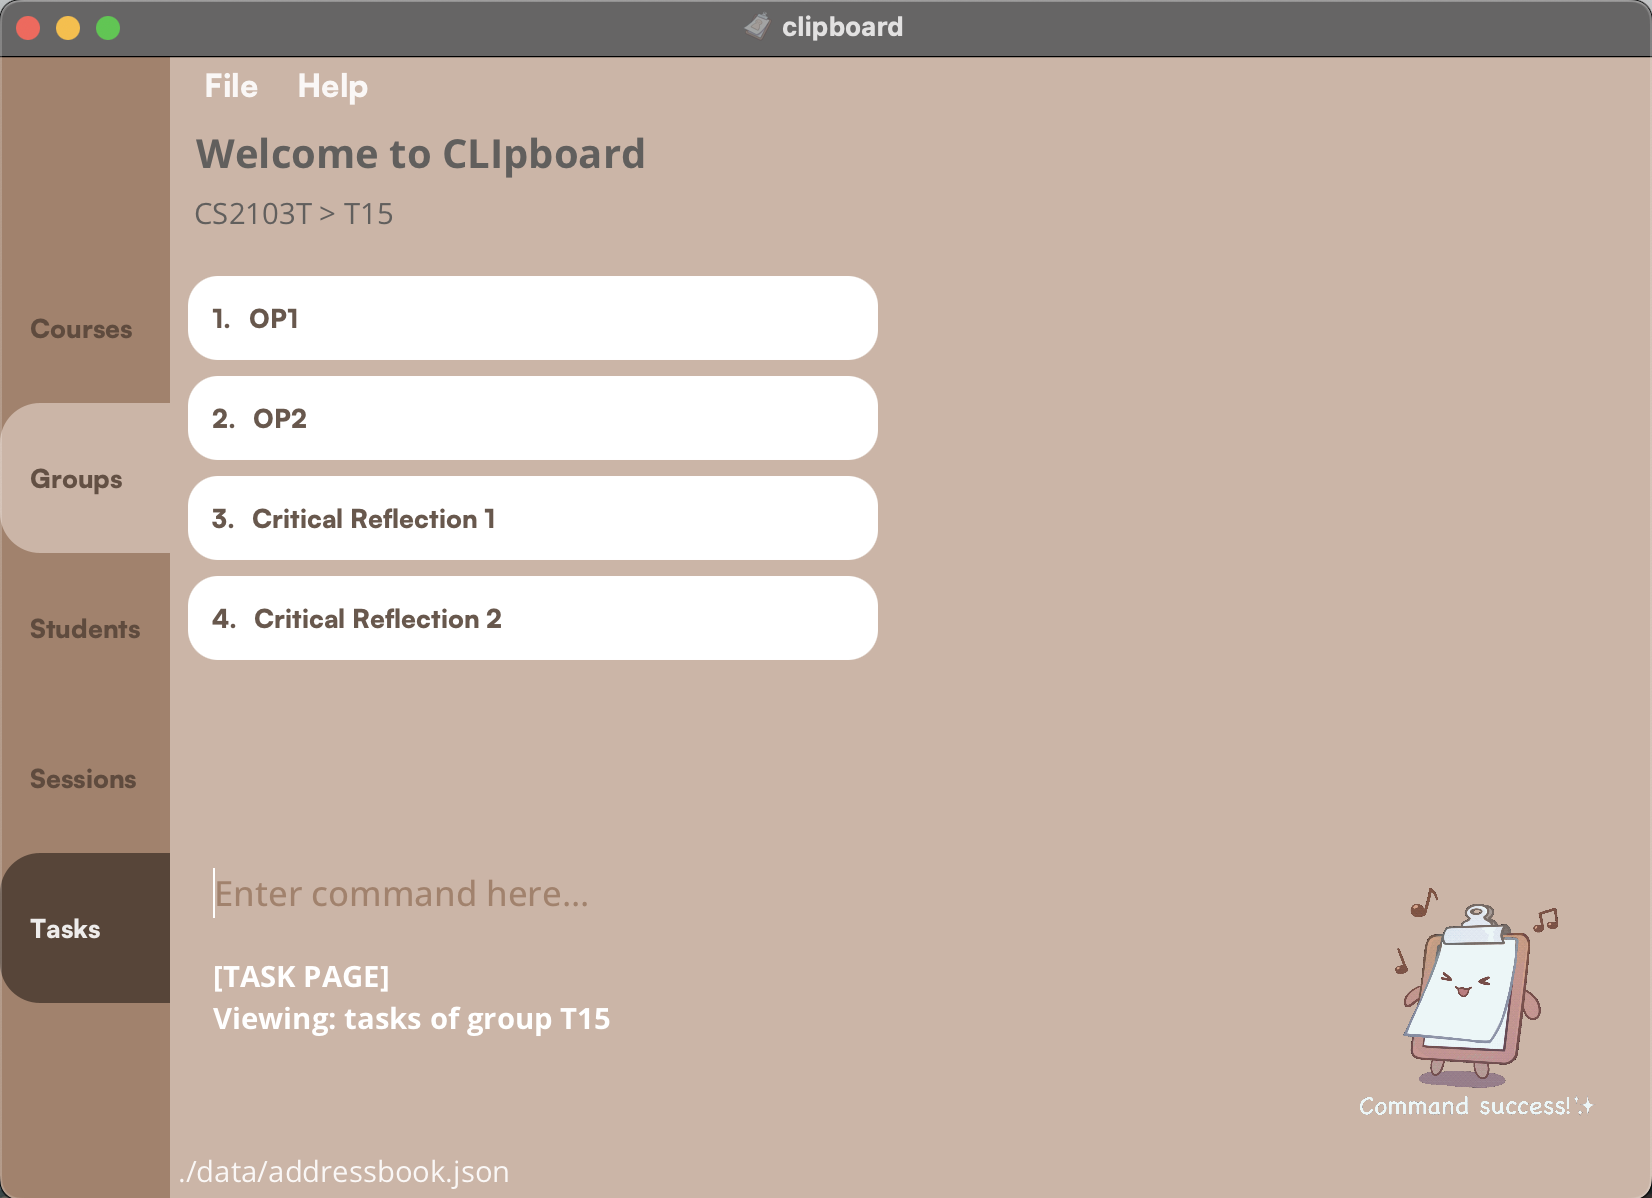
Adding a task: add task
This adds a new task to your selected group.
Command Format:
add task <TASK_NAME>
![]() Note:
Note:
- Adding tasks with the same task name is not possible.
- Task names can contain alphanumeric, special characters and white spaces. e.g. “AY2223S2-Midterm Practice Paper”
- Task names are case-sensitive. e.g. “task1” and “TASK1” are treated as different tasks.
Examples:
-
add task OP3will add a new task named “OP3”. add task Critical Reflection 3
Deleting a task: delete task
This removes a task from your selected group.
Command Format:
delete task <INDEX>
Examples:
-
delete task 1will delete your first task listed.
Editing a task: edit task
You can edit the name of an existing task in your task list.
Command Format:
edit task <INDEX> <NEW_TASK_NAME>
Examples:
-
edit task 1 CA5will rename your first task listed toCA5.
Finding a task: find task
You can filter your task list to show only tasks that contain specific keywords.
Command Format:
find task <KEYWORD> [<MORE_KEYWORDS>]
![]() Note:
Note:
- Keywords are case-insensitive. (e.g.
find task op1andfind task OP1will give you the same result) - Keywords are separated by spaces.
Examples:
-
find task 1will showOP1andCritical Reflection 1.
Selecting a task to assign grades: select
This command allows you to select a task and view the grades of your students with that task.
Command Format:
select <INDEX>
Examples:
-
select 1will show a list of students who were assigned the first task on the list.
Managing the Grades of a Task
In the following sections, you will find the features that are available to you after you have selected a task while on the Task Page.
Your current page would look similar to this:
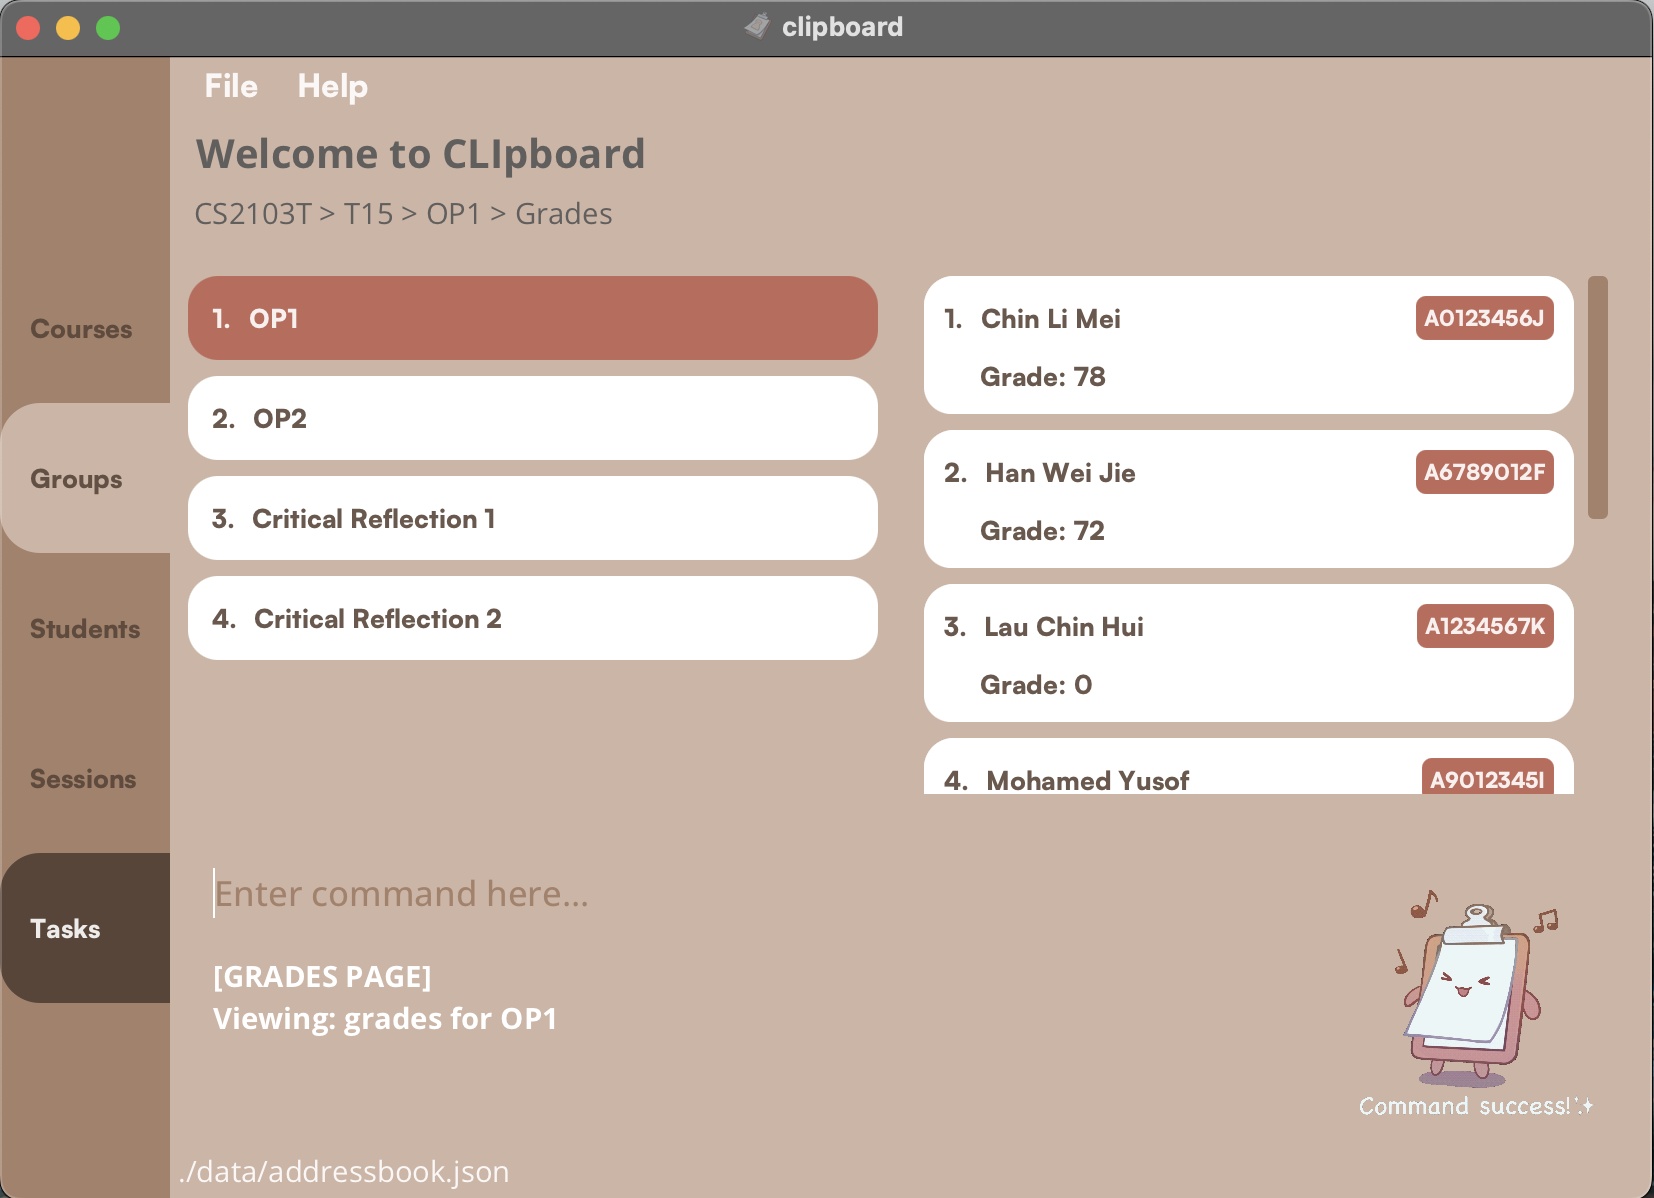
Assigning a grade to a student: assign
This assigns a grade to a student.
Command Format:
assign <INDEX> <GRADE>
0 and 100.
Examples:
-
assign 1 78will assign your first student on theRight Panethe grade of 78. -
assign 3 0will assign your third student on yourRight Panethe grade of 0.
Further Help and Support
If you run into any issues or bugs with CLIpboard, don’t hesitate to check out our GitHub Issues Page to see if anyone else has faced similar problems.
You can also submit a new issue and we will get back to you as quickly as we can.
Please feel free to also reach us at t154clipboard@gmail.com if you have any enquiries or require any further assistance.
Thank you for using CLIpboard!